Tuesday, May 20, 2014

T Time#3

Hello friends!! Its T time & this is Tanvi here to show you how to create a faux Chalkboard look on your cards. This was the first time I tried this & it was so easy that I wanted to share with you all.

Here are the materials required
CS - black, anti static pad, acrylic block, versamark ink pad, stamps, white pigment ink, white embossing powder, heat tool.

 Begin with black card stock. Rubbing an anti static pad over it will do wonders to prevent EP from sticking where you do not want!


Stamp the sentiment in versamark & cover with white EP & heat it.


Once this is done ....its time to add faux chalk "dust".  Take a paper towel and blend white pigment ink around the sentiments, as much or little you want.  


Remember pigment ink will take a while to dry so take care not to smudge the ink.
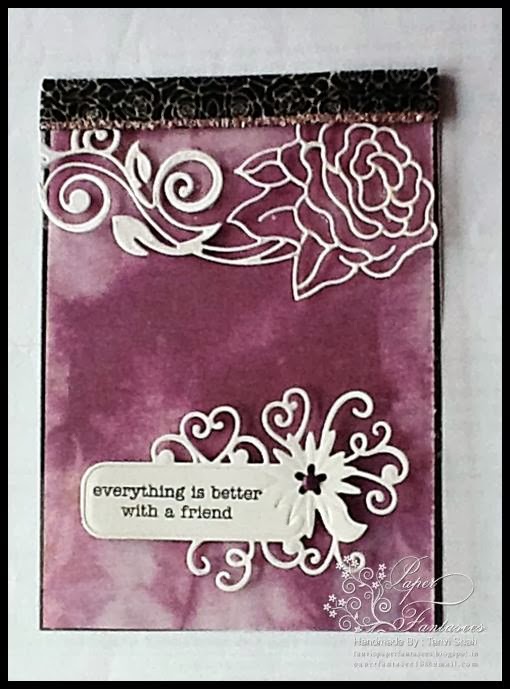


Here is the card  - 


And that's it!  So much fun to do.
I hope you enjoyed today's post and I hope you're enjoying our T time techniques too. Just leave us a comment if you want us to do any specific technique, we would love to do it !


Saturday, May 10, 2014

Guest designer JAYA.C - CSCC#3

Good morning dear crafters,

This is Smita here with the guest designer post today.An extremely talented crafter , Jaya is here with us to share her inspiration for CSCC#3.
Here she goes..

"Heylo, I am Jaya aka JC. I was so super thrilled and glad when Deepti Stephens asked me to GD in her super wonderful challenge. I've never done this before? :) I've hosted challenges, but never have Guest Designed anywhere :)) So, thanks Deepti for the opportunity.

I am a CAS crafter. Clean and Simple is what gets me. I love the simplicity of one layered cards - the 'get to the point' idea - non-superfluous Clean and Simple stuff. 

When Deepti sent me this inspiration picture - gorgeous inspiration indeed, if you know what I mean (grin) - I had to make a one layered card.

I'm not quite the collage-layered stamping person.. But this is where I ended.. Do you see the inspiration in it.. The layout and colours and the handsome hunk's golden skin in the clock? Lol. And don't forget the green grass and those lamps in the bottom of the picture. 


I loved making this one... And I hope you'd join along in this super challenge and have fun creating something fun. After all what are we without creativity, imagination and those golden hunks. :) 

I look forward to dropping by your entries to this awesome challenge. 

Have fun and God bless.

Jaya @ CraftyJC

Hope to see your creations inspired by our GD!!
 Have a crafty day!
Smita

Thursday, May 1, 2014

CSCC#3

A very Good morning to all. This is Tanvi here to announce our new challenge. We would love to see your interpretation of our inspiration picture. 


Please create something masculine and kindly mention how you got inspired by the pic.

Rules of our challenge remain the same, with one extra rule to have fun!!
1. New work please
2. Only cards are allowed
3. You can enter as many times  as you like
4. Feel free to combine with other challenges

The winner of this challenge will receive a gift voucher of Rs500/- from Itsy Bitsy


Our Design team has some great inspiration to share with you...

Smita was inspired by the shirt colors and tie!


Deepti Malik was inspired by the colors and went with the camping theme which guys enjoy. I love your interpretation Deepti.


Inspired by jeans, checks and the metal thing this is Deepti Stephens' creation.


The  shirt pattern, red n blue color inspired Poornima to make this card - 


Finally this is my card inspired by the shirt & tie in the pic.


Hope you are inspired and excited to play along with us and yes, we will soon be up with another post with our amazing Guest Designer for the month of April and a T- time by me :) 

Please add your creations below -


Tuesday, April 29, 2014

Winners!!


Hello friends ! Thank you so much for sharing your amazing creations in our second challenge, 'Create Something Catchy' Challenge #2. We thoroughly enjoyed seeing the variations in interpretation of the inspiration photo from lovely quilling to bright colors and brilliant design ideas. And now it's time to announce the winners!!


One girl stole our hearts with her beautiful brilliant and amazing creation and 'The Ultimate Creation' goes to 


Congratulations dear girl. Kindly write to info@itsybitsy.in to claim a gift voucher of Rs. 500/- and don't forget to grab your badge from the side bar.. :)

And here comes our Super picks!! 


We were amazed by your creations so much that we have a couple of  Honorable mentions :)


Congratulations friends, your work is amazing.. kindly grab your badge from the side bar.. :)

See you soon with a new challenge.. Until then take care and have fun.. ;)

Tuesday, April 22, 2014

T time #2 - Water coloring technique

Hi friends!! This is Deepti Malik and I am here with some fun techniques for you. I thought water coloring is a hot trend right now so why not share a couple of techniques that are both fun, quick and will make ur project look amazing :) First up... Here's what the projects look like once complete. I decided to make some tags. 
You can apply the same technique on ur cards ! These technique are best for building a back ground for ur projects. So let's quickly take you to the technique :)

The supplies needed for the technique are - 
1. Water color paper tags/ card stock, 
2. Water colors - I used Twinkling H2O, any kind of water colors would work.
3. Brush - a flat brush
4. Some facial tissue - for Technique #1
5. Exacto knife - for Technique #2
Basic supplies needed for the technique
Other supplies - to dress up the tag (you can dress ur card the way you like)
1. Stamps - You can use any, I used Penny black Hugs set, Inkadinkadoo Christmas characters set
2. Inks - Memento Tuxedo black, Versa mark 
3. Markers for coloring the images - I used Spectrum Noir
4. Embossing powder - I used opaque white from Whisper
5. Scissors, foam dots, ribbon n heat tool

Here is the step by step process for

Technique #1 - Creating Clouds

Start with water coloring the card base/ tag. For this first apply a thin coat of water on base, followed by water color. This will result in smooth water colored surface. Now to create the cloud use a dry facial tissue, crumple it and dab it randomly on water color surface while its still wet. This will result in very realistic cloudy sky. Here's the process shown in pics :)


Technique #2 - Exacto knife background 

Start with water coloring the card base/ tag. For this first apply a thin coat of water on base, followed by water color. This will result in smooth water colored surface. The Exacto knife background building technique involves making superficial cuts on the water color card stock while water color is still wet. once we make these cuts, the water color seeps into the grooves of these cuts. I decided to make snowflakes by making cuts like an asterisk (*) . The same process will work with creating grass, trees or anything ur heart desires :) Here's the process shown in pics :)


Hope you enjoyed  the photo tutorial, though I wanted to make a video tutorial, I was not successful. Hopefully, will be able to make one for you guys next time. Would love to see what you created using this technique. Have fun!!


Thursday, April 10, 2014

Meet our April Guest Designer!!

Hello friends!! I am super excited to introduce to you our April Guest Designer, Sathya Kala. I am sure you will love her creativity. So let's welcome her...

Hiya!! Sathya Kala,here.  Thank you so much Deepu (Deepti Stephens) for inviting me as Guest Designer  and this is my ever  first guestie post.
Started blogging in 2011 as a quiller and due to a constant push from my dear hubby, came out from my comfort  zone and now started cardmaking. Amidst of my daily mundane, Crafting acts as a therapy and am truly enjoying it!!
Hope you like my card! Do try this chill quill pill and play along.. :)

Wow!! isn't this lovely :) Thank you so much Sathya for joining us and now my dear friends what are you waiting for take all your crafty things out and join in the fun at CSCC #2

Tuesday, April 1, 2014

CSCC #2

Hello my crafty friends!! this is Deepti well the other Deepti ;) and I am here with a new challenge to intrigue and indulge you to create something catchy. The inspiration is incredibly fun and you will have numerous ways to interpret it. So here's the inspiration image...


Well well. I know your heart skipped a beat seeing this lovely image. Aren't those colors incredible and those of you who do quilling this is your challenge. Show us your quilling on a card. And those of you who have no clue about quilling just like me ;) no worries you can go with the colors, or by the heart DING!! We would love to see, how you interpret it :)

Rules of our challenge remain the same, with one extra rule to have fun!!
1. New work please
2. Only cards are allowed
3. You can enter as many times  as you like
4. Feel free to combine with other challenges


The winner of this challenge will receive a gift voucher of Rs500/- from Itsy Bitsy

Our Design team has some great inspiration to share with you...


Hope you are inspired and excited to play along with us and yes, I will soon be up with another post with our amazing Guest Designer for the month of April and a T- time by me :) 

Please add your creations below -


Wednesday, March 26, 2014

Winners! Winners!

Hello lovely ladies! Thank you so much for taking part in our first challenge, 'Create Something Catchy' Challenge #1. We truly had some beautiful 'pink and black' entries. And now it's time to announce the winners!!

One girl stole our hearts with her beautiful creation and 'The Ultimate Creation' goes to 


Congratulations dear girl. Kindly write to info@itsybitsy.in to claim a gift voucher of Rs. 500/- and don't forget to grab your badge from the side bar.. :)

And here comes our super picks!! 


Jasleen and


Congratulations friends, your work is amazing.. kindly grab your badge from the side bar.. :)

See you soon with another new challenge.. Until then take care and have fun.. ;)


Saturday, March 22, 2014

T Time #1

Hello friends! Welcome to 'T' time and this is Deepti Stephens here showing you a technique -'how to use chalks'. :)

Materials Required :


1. Card stock (any size)
2. Any detailed or solid stamp, here I'm using Inkadinkado stampset.
3. Versamark ink pad
4. Chalks (any chalks will do) but here I'm using EK Success chalks because they are so vibrant
5. Sponge daubers or a cotton swab, but I suggest you to use sponge daubers because they give you nice results.
6. Sentiments (I'm using hero arts) and a black ink and an acrylic block.. :)

Ok! Now let's get in to the procedure.. I thought of making a video but things around me didn't co- operate well, so I ended up making a photo tutorial. 

Step 1


I've stamped the big butterfly in versamark ink..

Step 2


Now take a sponge dauber and dab it on to the stamped image..
Here I have a tip for you!
* always tap or dab the sponge dauber or cotton bud
* do not rub on to the image cause it will get smeared..

Step 3


I have used red, orange and yellow colors just to give an ombre effect.. ;)
* you can also see the colors that is sticking around the stamped image, you can rub it easily with an eraser, but I love that effect so I kept it that way.. :)

And here is the final card with the sentiment..


Hope you've enjoyed this tiny tutorial. Would love to hear from you..
Thank you so much for visiting the blog..
Have fun.. ;)

Wednesday, March 5, 2014

Meet our March Guest Designer!

Hello friends! We are super excited to introduce our March guest designer, Sindhura Prajay.. It's a pleasure to have you here :)

Now over to her..


Hello! Sindhu here. I wish to thank Deepti for inviting me to guest design for her awesome challenge blog! Thanks SO much Deepti, you are so sweet! :) 


I started card making an year and a half ago (All thanks to my husband who pushed me to be where I'm today!) and I'm kind of addicted to it now! After a stressful day at work, making cards is what I look forward to every evening.


I hope you like what I made for the current challenge. Have a great day everyone!

Thank you so much Sindhu for this wonderful card. Loved it so much.. <3

Ok friends! See you soon.. :)

Saturday, March 1, 2014

We are back with a bang! CSCC #1

Hello friends! Yes! we are back again. I'm so happy to re-launch the challenge blog again and this is just because of your pure pure love and affection. Thank you so much for showing such sweet love on these challenges. Sometimes we do take breaks just to kill our monotony, the same thing happened here and now we are back with new hopes and inspirations. For a change we changed our challenge blog name... Catchy Challenges to 'Create Something Catchy' Challenges.. There will also be a new feature called            'T Time'.. T means technique, tip or tutorial, that will be shared by our DT...Cool huh?

Okay! Let's jump into the challenge now..


The challenge is very simple, get inspired by the above pic and create a card.. :)

Rules
1. New work please
2. Only cards are allowed
3. You can enter as many times as you like
4. Feel free to combine with other challenges.

The winner will receive a gift voucher of Rs. 500/- from Itsy Bitsy


Let's see what the 'Catchy Girls' have come up with..


Hope we have inspired you enough! Now it's your turn to play along and have fun.. ;)